WordPress Hosting: Build your website in 5 easy steps
Introduction
In this article I’ll be your WordPress guide and I’ll be guiding you on how you can get your website up and running using WordPress, and we’ll briefly explain what’s managed WordPress hosting.
You might be asking yourself what’s managed WordPress hosting? or even what’s hosting, but don’t feel overwhelmed, we’ll go through the details, step by step to ensure you understand the terminology, and that you are able to ship out your dream website!
If you’re completely new to hosting, we compiled a great read in our ultimate hosting guide that might be a helpful read before jumping head first into building your first website.
What’s WordPress?
WordPress (WP) is the most powerful content management system around, and is recognised nowadays as the de facto standard when it comes to choosing a CMS (Content Management System).
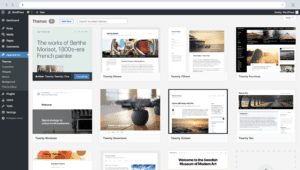
A content management system is a piece of software that allows you to manage the content you publish on your website, meaning that it provides you with the capabilities of creating pages, posts, categories and tags among other functionalities. – A visualisation example of a CMS (WordPress) is shown in the image below.
WordPress was founded on 27th May 2003 by Matt Mullenweg and Mike Little. – Since then almost half the websites on the internet is using WordPress, this is due to its ease of use and capabilities, such as a vast amount of free themes, the ability to build a custom theme, the vast plugins available on the market that will pretty much do anything you have in mind, and best of all WordPress to date, is still open-source and free to the public.
It’s worth mentioning, that WordPress being open-source means that WordPress can be downloaded free of charge, it’s a piece of software – a fairly large one at that – open to the public and maintained publicly, which re-assures you that the code is clean and reviewed by the public.
If you’re interested in the facts, like I am, you can find more information about WordPress on wikipedia.
What’s WordPress hosting?
We’re getting there! now that we know what’s WordPress and a CMS – what in the world is wordpress hosting? – before we answer that question, what is hosting? Hosting is space that you purchase online to host or store your website/files – the files/website you store on your ‘space’ is accessible to users on the internet, and that is how your website makes it to users online.
If you’d like to learn more on hosting, drop by our hosting guide, otherwise, let’s go over what’s WordPress Hosting.
To put this simply, how can you use WordPress? to use WordPress you need to install WordPress (which we’re going to show you how in this article), this for someone that’s new to the technological world can be a tiny bit difficult. The other option is to utilise WordPress hosting, where the hosting provider handles all of the hassle that comes with installing WordPress and all you need to do is worry about the content and the visuals of the website, this is what we call managed WordPress Hosting or WordPress Hosting.
What are the benefits of choosing WordPress hosting?
Firstly, the installation of WordPress is handled, and you don’t have to worry about maintaining that installation going forward – besides that the installation is carried out by someone who specialises on setting up these environments, this means that they are aware of security issues (e.g. file permissions, vulnerable plugins et cetera), plan and implement performance optimisations (such as caching) and offer you support when needed.
Those aren’t all the benefits of using WordPress hosting – some offer automatic backups, automatic updates and other advanced features – but, the gist of it is, you get the best possible service and the least hassle.
Choosing the right managed WordPress hosting
These are our favourite hosting providers as of right now:

We personally tend to lean towards using DreamHost and WP Engine the most – usually we install WordPress ourselves on DreamHost even though they do offer 1-Click WordPress Installations, and use WP Engine’s WordPress hosting when we want to ship something out quickly and website speed is critical since it’s more expensive, that’s not to say that DreamHost is slow – ultimately it’s how you optimise the site, but WP Engine tends to be a tad faster.
As for HostWinds, we honestly don’t use it for WordPress hosting, but it’s a reliable option if you want to install WordPress yourself.
Building your WordPress site
Buy a domain you love – Step 1
The first step towards building your WordPress site is to buy yourself a domain you love! BUT be smart with your domain name, as it does affect your presence on Google. – If you don’t know what a domain is, drop by the what’s a domain section in our hosting guide.
In order to buy a domain, the first step is to find a reliable domain registrar – a company that is authorised to sell domains – we usually use DreamHost or Dynadot to buy our domains.
Before you jump into buying a domain name, make sure that the domain name aligns with what you’re targeting, e.g. I’m targeting people that want to learn about hosting, and people that search for hosting guide – therefore I picked thehostingguide.com – keep in mind that picking the right domain is important.
If you’re looking for a domain that is aged (old) and has some presence on the internet / Google, you can use services like dropcatch and ahrefs website authority checker, to check the domain ranking.
Choose a hosting provider – Step 2
Now that you have bought your domain, it’s time to choose the right hosting provider – this is where your files will sit and served to your users, this is your real estate on the internet.
You have two options, you can either go for WordPress hosting (Skip steps 4 and 5 – as installation is done by hosting provider) or normal hosting (cheaper but a bit more work). – These are our favourite hosting providers:


If you’d like to read a bit more on the hosting providers above, you can drop by our hosting providers list. – but you can rest assure that the above hosting providers are top quality and tested by myself and the rest of the team.
Set up your DNS records – Step 3
Now that we have a domain and hosting, how do we tell our domain where our files are? this is where we’d need to direct our domain towards the hosting provider.
This is usually achieved easily by simply going to your hosting provider (where your site is hosted) and getting the nameservers – nameservers are simply domains that point to your hosting provider – usually multiple ones just in case a server goes down, for redundancy and performance purposes.
Once you have found the nameservers from your hosting provider, go to your registrar and put in the nameservers there – in some cases registrars don’t support nameservers, you can simply add your websites IP address in the A record – with the name @, as shown below:
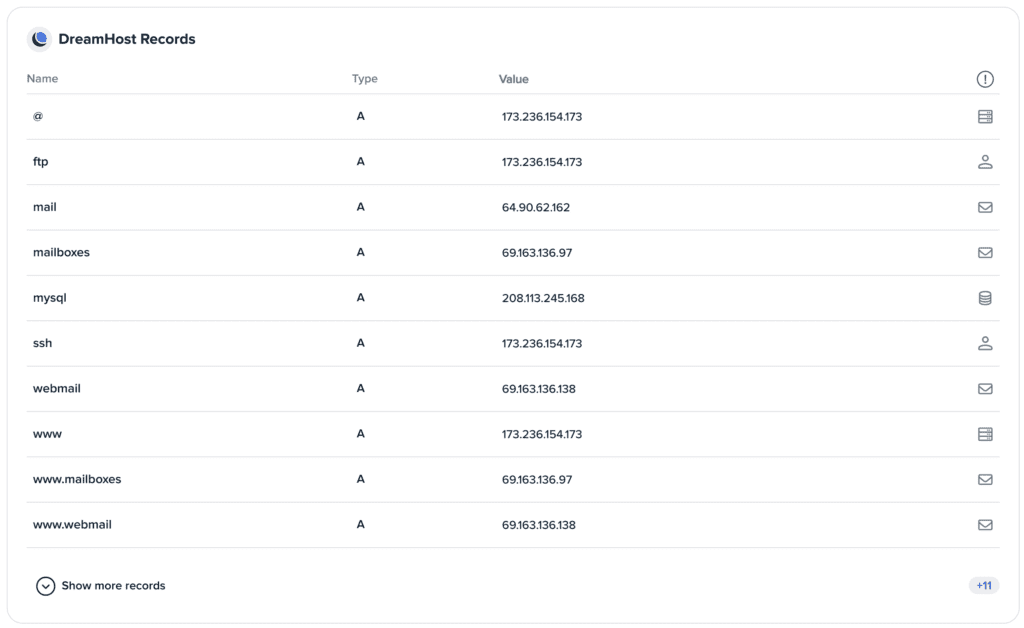
As you can see above, the first record with name @, points to my hosting with the IP address 173.236.154.173 – replace the IP address with the IP address or domain provided by your hosting provider, if you also have www A record, as I do on line 8 in the image above – change it to your hosting IP too, as that handles www.yourdomain.com resolution. – All of this is only relevant if the registrar doesn’t provide you with an easy input for nameservers that is.
Note that when you update any DNS records it’s expected that it takes a few minutes to propogate to all internet nodes in the world, so if your domain is still not resolving, give it a few minutes and try again.
If you’d like to learn more about dns, drop by the DNS section in our hosting guide.
At this point if you chose WordPress hosting, you’re done! well done! – There might be some learnings in the optimisations section in Step 5, but otherwise, you’ve made it! Congratulations!
Create a database – Step 4
We’re getting there! to create a database (what’s a database) we need to login to our hosting provider and depending on the control panel provided by them, we need to create a database that we’ll link to from our WordPress config, an example screen from DreamHost is shown below:
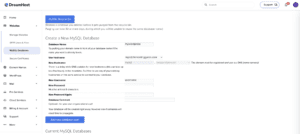
It should be fairly simple in most hosting providers, but in case you find difficulties check out this detailed guide from WordPress.org.
Keep the database host, port, username and password in mind as we’ll need to set that up in our WordPress config next.
Installation – Step 5
The first step towards installing WordPress on your hosting is to get access to the hosting space, normally via FTP; once you have set up your FTP client (you can use FileZilla or so) and connected to your hosting space, follow the steps below:
- download WordPress and extract the archive.
- Once you’ve downloaded the archive and extracted the archive, access the files and rename
wp-config-sample.phptowp-config.php– this isn’t mandatory if you find difficulty to rename the file – as newer versions of WordPress does this for you, in which case skip the next step (step 3). - Edit
wp-config.php– this is where you add your database information among other information – This should be in line with the editing instructions from WordPress.org. - Upload your files to your hosting via FTP, if you’d like your website to be under a specific path, such as
/my-blog, create the folder and place the WordPress installation in that folder.
Once all of the above steps are done, go to the domain (if you installed WordPress under /my-blog, then go to yourdomain.com/my-blog) and follow the installation wizard there.
If you find difficulty in following the steps above, there’s a detailed installation guide hosted on WordPress.org.
Frequently Asked Questions (FAQs)
Conclusion
Congratulations! you’ve done it, We’re proud of you!
We hope our article was helpful in building your first (or not first) website, let us know your experience in the comments! did you go with WordPress hosting or did you go head first and installed WordPress?
If you have any feedback or would like us to write about something specific, we’re a team of engineers so we’re happy to help where we can! drop us a comment or contact us via email at hello@thehostingguide.com or our contact form.
Hey there, I’m Julian! a software engineer and conference speaker, with a passion for hosting! That’s why I created thehostingguide.com – to help others like me, build their first website! On my blog, you’ll find friendly reviews, easy-to-follow tutorials, and all the latest hosting news and trends. So, kick back, relax, and let’s build websites together!

